

 |

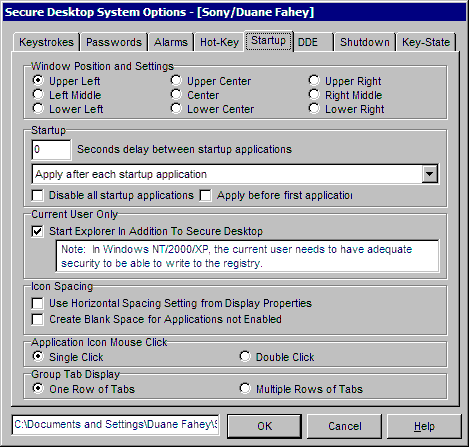
Window Position and Settings - Sets the initial position of the Secure Desktop toolbar on startup.
Startup - When you have several applications starting, where one application may depend on another for DDE or OLE connectivity, you may want a delay between each application starting. By setting this delay, one application should be finished loading before another loads up. If you don't wish to apply the time delay to all startup applications, you can choose the first x number of startup applications with the pull-down selection. If you would like to temporarily disable startup applications, for debugging purposes, you can do that using the checkbox provided. If you would like to apply the delay time before your first configured program, you can use the checkbox provided.
Current User Only - When this check box is checked, the current user (in the example dialog above the current user is named Administrator), would get both Secure Desktop and the Explorer Desktop, primarily for administration purposes. Note that in Windows NT4/2000/2003/XP this user needs to have the ability to write to this registry location, such as the administrator. Secure Desktop actually starts the Explorer Desktop, so if the administrator exits Windows using Explorer, the next user still gets Secure Desktop as the shell.
Icon Spacing - Secure Desktop normally spaces the icons, by checking the checkbox for Horizontal Spacing, you can just change the system horizontal spacing properties in the control panel. Control Panel, Display, Appearance Tab, Item pull-down to Icon Spacing (Horizontal).
Secure Desktop normally "bunches up" the icons if applications have been disabled. You can now have a blank space for the missing application. For instance if F1 and F3 where enabled, but F2 was disabled, there would be an icon sized space between F1 and F3.
Application Icon Mouse Click - You can now choose to have single or double-click for starting applications with the mouse. The default is Single Click. Note that this feature applies to all application icons.
Group Tab Display - You can now choose to have a single row of group tabs or multiple rows of group tabs. This allows for longer group descriptions.
INI File Window - To the left of the OK button. This tells you the exact INI file that is being edited while in this dialog.


 |